I am super excited to share this project with you! This is my first ever complete furniture build! I admit there was some pressure going into this project not knowing whether it would turn out the way I had envisioned. I came up with this design after looking for ideas on Pinterest and YouTube. I can’t say that it’s perfect, but I can be proud to say that this won't be the last furniture piece I create!
This post contains affiliate links, and I will be compensated if you purchase something when you click on my links.
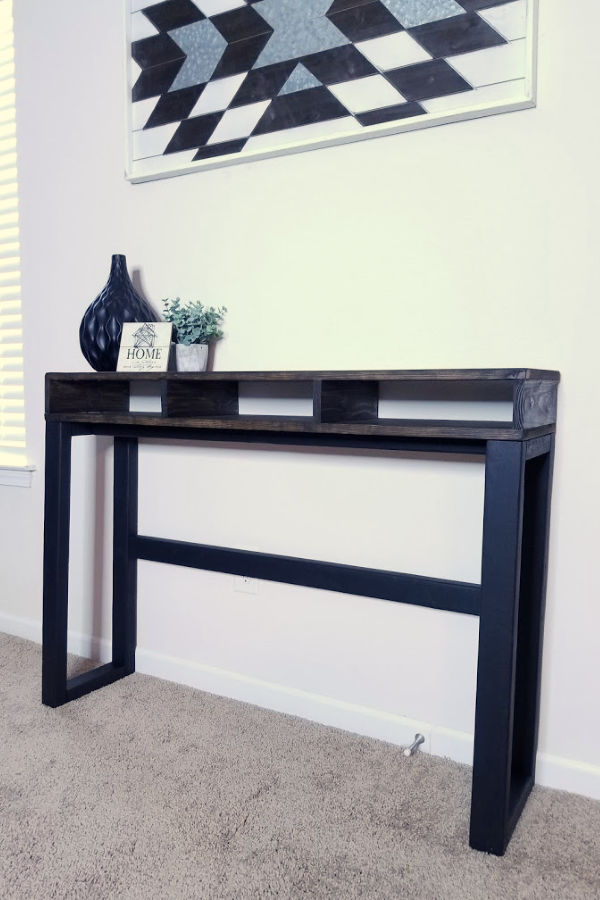
This rustic console table will be part of my family command center. I believe it’s essential to have a surface to corral all those loose office supply items that can get lost easily.
My total cost for this table came out to right around $50. That includes all the wood, screws, and extra drill bits that I needed. Besides my miter saw and drill, I did not use any other special tools! You could still make this even if you didn’t have a saw, by asking your hardware store to cut your wood to the desired length.

Here’s my cut list
* (2) 1x12 boards at 47 7/8”
*(4) 1x4 boards at 11 1/4”
*(4) 2x3 boards at 30”
*(4) 2x3 boards at 8 1/4”
*(2) 2x3 boards at 43”
These are exact measurements and are based on the size and height I wanted my table to be. My final table measurements are just under 4 feet long, 35 inches tall, and 1 foot in depth. I ended up with a slightly shorter table because I bought 4 foot boards and had to cut the ends to make them square. I would suggest buying longer pieces than needed to account for cutting.
I used 3 sizes of wood screws, 2 inch, 3 inch, and 3 1/2 inch. I also used countersink drill bits so that the screw heads would sink in to the wood and I could fill in the holes.

Assemble the legs
*I attached the 8 1/4” pieces to both ends of the 30” piece, using the 3 inch screws, creating a 90 degree angle
*I attached the other 30” piece to the opposite end of the 8 1/4” pieces


After assembling the table legs, I worked on the top.
This is where the 1x4 pieces are attached to each 1x12 board using the 2 inch screws. I only used the countersink bits for the board that would be the top of the table. Two of the 1x4 pieces are attached at each end creating a 90 degree angle. The space from each outer 1x4 to each inner one measures 14 3/4 inches.


Complete the top
*Using the same 2 inch screws, I attached the second board to the opposite end of the 1x4’s
To create a base that would be stable I attached the 43 inch pieces to each leg using the 3 1/2 inch screws. One piece is connected at the center of each 8 1/4 inch piece. The second piece connects the base at the center of two 30 inch leg parts.


After the base and top were assembled, I sanded everything. I decided I wanted a two tone look, so I painted the base and stained the top.

Use your favorite paint
*I used the same black furniture paint that I used to paint my charging station.
The final step was attaching the table base to the top. I simply centered the base with the underside of the table top, and drilled in the 2 inch screws along the center.

As I said before, this didn’t turn out perfect by any means, but this process has given me a bit of a confidence boost to tackle bigger projects! Maybe you’ll try taking on a furniture project?! I’d love to know!
Save for later!